HomeAgain Transfer Administration
The "HomeAgain Transfer Administration" section of your software acts as the control center and logging tool for all automated microchip enrollments. It is not where you initiate a transfer, but rather where you manage and monitor the transfer process after it has been triggered by another action (like an adoption or transfer).
Here's how it works:
-
Triggering an Enrollment: When a specific, pre-configured action is completed in your software (e.g., an adoption, a reclaim with the checkbox marked, or a transfer using a designated reason), the system generates an enrollment request. This request contains all the necessary pet and owner information.
-
Generating Activity Flags: The system assigns a specific activity flag to the request:
-
E: for a new enrollment (e.g., a new adoption).
-
U: for an update to an existing enrollment.
-
D: for a delete request (e.g., an undone adoption).
-
-
Sending the Transfer: The system then attempts to send this enrollment request to HomeAgain's database. This usually happens in real-time or in a scheduled batch process.
-
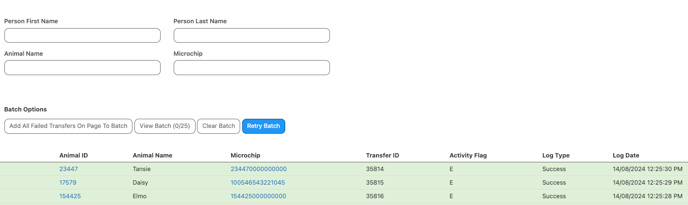
Viewing the Transfer History: The Transfer History section within the HomeAgain Transfer Administration menu is where you can monitor the outcome of these transfers.
-
You can see a log of all transfer attempts, including whether they were successful or if they failed.
-
-
Troubleshooting Failed Transfers: If a transfer fails, the system provides a method to troubleshoot it.
-
Check the Error Message: You can hover over the "error" column in the transfer history to see the reason for the failure.
-
Retry the Batch: The system allows you to add all failed transfers on a page to a new batch and then retry sending them. You can repeat this process for any transfers that continue to fail.
-
-
Administrator Oversight: If transfers continue to fail after retrying, the administration console serves as the point of record to then contact HomeAgain support, providing them with the details of the failed transfers for further investigation.
The Manual Process for Non-HomeAgain Chips
Because the automatic upload is not an option, you must follow a manual process to ensure these chips are registered. There are two critical steps, and it is a best practice to perform both.
-
Register with the Original Manufacturer (Primary Registration):
-
This is the most crucial step. The manufacturer of the microchip is the primary holder of the registration data. When a lost pet is found and its chip is scanned, a vet or shelter will often use a universal lookup tool (like the AAHA Universal Pet Microchip Lookup Tool) to find the original manufacturer first.
-
How to do it:
-
Use Report 379, "Microchipped Animal Report," in your software to get a list of all animals that were adopted with non-HomeAgain microchips.
-
This report will provide the microchip number. You can then use an online lookup tool to determine the chip's manufacturer (e.g., Avid, AKC Reunite, PetLink, etc.).
-
Manually go to that company's website or call their professional support line to update the ownership information to the new adopter. Some may have bulk transfer forms for shelters.
-
-
-
Manually Register with HomeAgain (Secondary Registration):
-
This provides a crucial second layer of protection, as many shelters and vets use the HomeAgain database as their first search tool.
-
How to do it:
-
Log in to your shelter's professional account on the HomeAgain website.
-
Navigate to the online enrollment section.
-
Manually enter the microchip number and the new adopter's information for each pet.
-
HomeAgain will recognize it as a non-HomeAgain chip but will still register it in their database. There may be an associated fee, but many shelters have pre-paid enrollments.
-
-
How does the HomeAgain setup work?
-